
Introduction
In the world of science education, visual aids are critical for effective learning. Among these aids, the labeled diagram of a microscope stands out as an essential tool. This diagram not only illustrates the key parts of the microscope but also emphasizes how each component functions during the observation of microscopic specimens. For students, understanding these components creates a sturdy foundation for exploring the fascinating world of microscopy.
The labeled diagram of a microscope serves as a great starting point for students. It provides visual clarity, making it easier for them to absorb complex concepts related to biology, chemistry, and physics. As students engage with the labeled diagram, they learn to identify components such as the eyepiece, objectives, stage, and light source, laying a robust groundwork for their scientific education.
Key Components of the Labeled Diagram of a Microscope
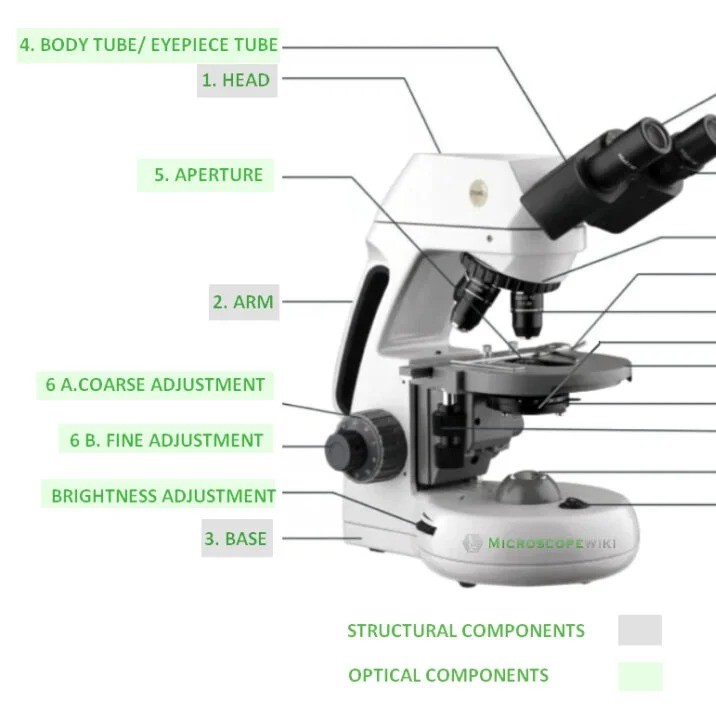
A well-crafted labeled diagram of a microscope typically identifies at least ten to twelve key components. Understanding these parts is vital for students as they start to operate microscopes. Here are the main components usually labeled on such diagrams:
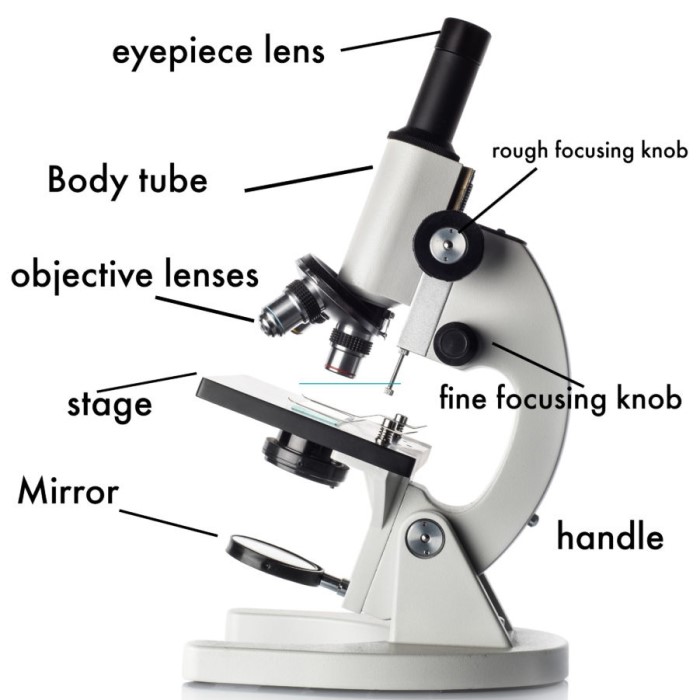
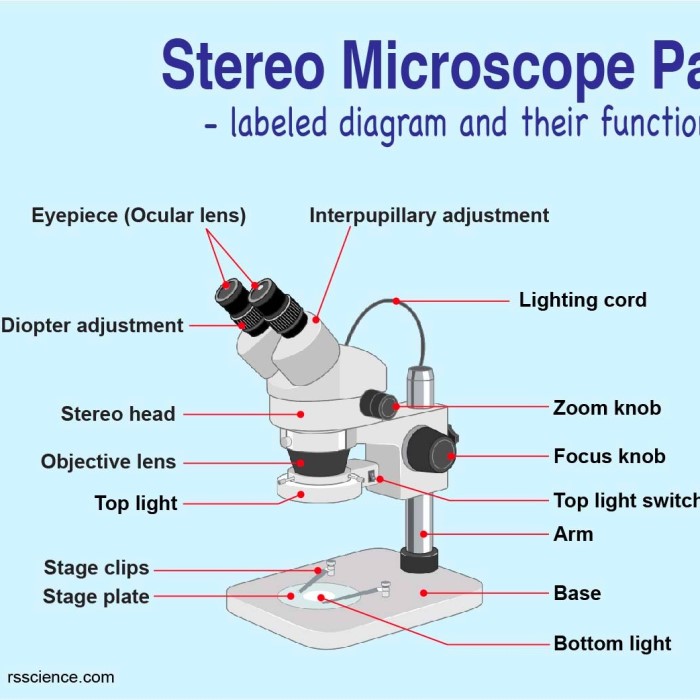
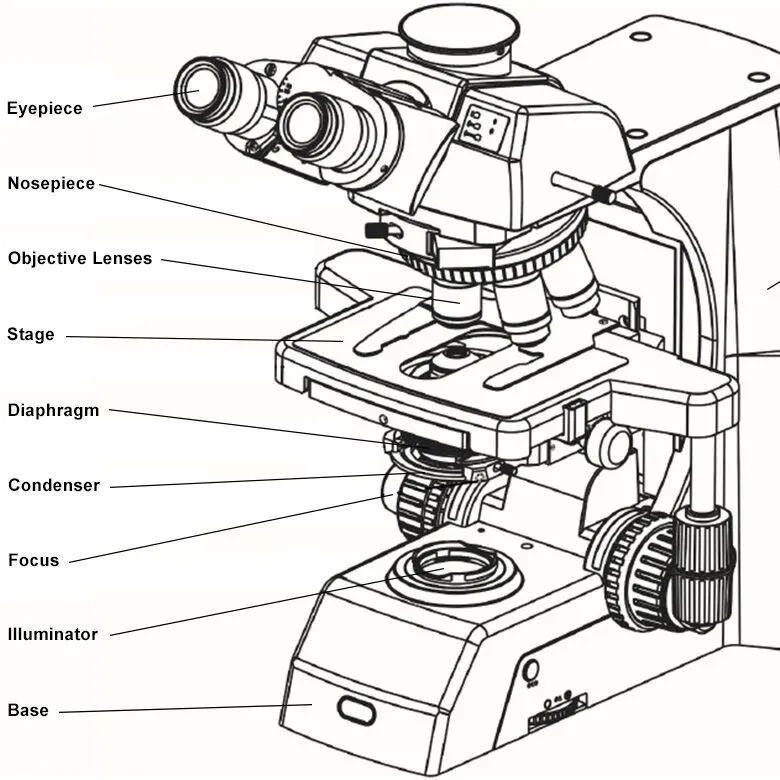
- Eyepiece: The lens that the viewer looks through, often having a magnification of 10x.
- Objective Lenses: These lenses vary in power, typically ranging from 4x to 100x magnification, allowing for close-up views of specimens.
- Stage: The flat platform that holds the microscope slide. It features clips to secure the slide in place.
- Light Source: This could be a mirror or an electric bulb that illuminates the specimen, facilitating clear visibility.
- Condenser: This lens concentrates light onto the specimen, improving the clarity and detail of the image.
- Diaphragm: This mechanism adjusts the amount of light reaching the specimen, playing a role in contrast and detail.
- Arm: The structure that connects the body tube to the base and is used to carry the microscope.
- Base: The bottom of the microscope that stabilizes the entire instrument.
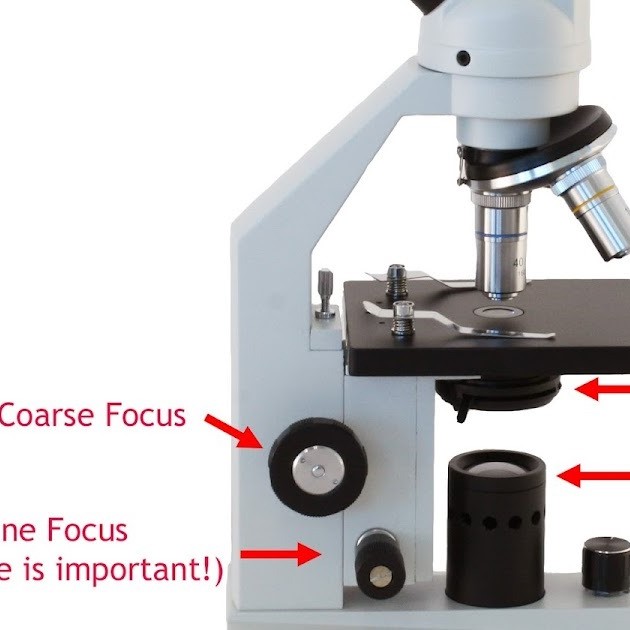
- Fine Adjustment Knob: This knob is used for precise focusing after course adjustments.
- Course Adjustment Knob: Used for quickly bringing the specimen into focus.
- Revolving Nosepiece: This holds the objective lenses and allows the viewer to switch between different magnifications.
- Stage Clips: These clips fasten the slide securely on the stage.
Each of these components plays a unique role, contributing to the overall functionality of the microscope. Students should familiarize themselves with these parts, as this understanding is critical for their practical applications in labs and scientific research.
Importance of Learning the Anatomy of a Microscope
Learning about the anatomy of a microscope holds considerable importance in student education. A labeled diagram provides students with a visual reference, which is especially beneficial for those who learn better through images rather than text. Understanding a microscope’s anatomy allows students to work confidently with this instrument.
Additionally, knowledge of microscope parts enhances students’ ability to troubleshoot issues they may encounter during experiments. For example, if the image appears blurry, knowing the role of the fine adjustment knob enables them to make appropriate adjustments. In essence, this knowledge promotes self-sufficiency in experimental settings.
Furthermore, understanding the anatomy of a microscope fosters curiosity. Students gain insight into how microscopes work and how they can be employed to explore various aspects of the natural world. This exploration invites questions and prompts further investigation, aligning well with the goals of science education.
Using the Labeled Diagram in Teaching Environments
Teachers often incorporate labeled diagrams into their lesson plans to facilitate learning. A labeled diagram of a microscope can be a core part of introductory lessons in biology and related subjects. Using this visual aid allows teachers to explain the parts of the microscope alongside their functions as students follow along.
Moreover, students can benefit significantly from engaging activities that involve drawing and labeling their diagrams. This hands-on approach reinforces the lessons learned, as students actively participate in creating their resources. After identifying parts of the microscope via direct observation, students can then practice by sketching labeled diagrams, enhancing their retention of information.
To optimize the learning experience, teachers can incorporate technology through interactive online diagrams or apps that allow students to visualize their understanding. These interactive resources can deepen students’ comprehension as they manipulate microscope diagrams, simulating real-life experiments.
What Are the 12 Parts of the Microscope?
When asking, “What are the 12 parts of the microscope?” the answer lies in the combination of essential components mentioned earlier. Understanding each part is crucial for students when working with microscopes. A thorough knowledge of parts helps students utilize the microscope effectively, thus enabling successful exploration of specimens.
Students should also learn about the interconnectivity of these parts. Understanding how components work together will encourage students to think critically about their experiments. For instance, the relationship between the diaphragm and the light source is vital in controlling the clarity of what they observe.
What Is a Microscope with a Diagram?
A microscope with a diagram is a simplified representation that helps students visualize and understand the various components and their functions within the microscope. These diagrams are useful for instruction, allowing students to refer to the different parts while handling the microscope themselves. This relationship between the diagram and the actual instrument fosters better learning.
Furthermore, diagrams can vary in complexity. Some diagrams may showcase the parts without extensive detail, serving as a basic introduction. Others may include more intricate details, suitable for advanced students who wish to delve into the intricacies of microscopy.
How Do You Label a Microscope Drawing?
The process of labeling a microscope drawing typically involves identifying each part accurately and placing clear labels next to or pointing toward the specific component. Students can follow these simple steps:
Observation:
- Thorough Examination: Students must take the time to closely examine every component of the microscope. This process can be facilitated by using either an actual physical microscope or a detailed labeled diagram.
- Focus on Details: Encourage students to pay attention to specific features of each part, such as the eyepiece, objectives, stage, and light source. This will enhance their observational skills and familiarity with the instrument.
- Encouragement of Curiosity: Prompt students to ask questions about the function of each part and how they work together to magnify specimens. Engaging their curiosity will deepen their understanding.
Sketching:
- Initial Outlines: Students should start by making rough sketches of the microscope. Using a pencil allows them to create light outlines that can be adjusted easily.
- Inclusion of Details: They should aim to capture all observable parts in their sketches, such as knobs, the arm, and the base, ensuring that the proportions and layout are accurate.
- Creativity in Representation: Encourage students to add unique elements to their sketches to reflect their personal understanding while maintaining accuracy in representation.
Labeling:
- Clarity in Labels: After completing the sketch, students should label each part clearly and distinctly. Clarity is crucial in educational diagrams to aid understanding.
- Use of Straight Lines: It’s important for students to connect each label to the corresponding part with straight lines. This prevents confusion and helps in easy identification.
- Consistent Formatting: Suggest that students maintain a consistent format for labeling—such as font size and style—to enhance the professionalism of their work.
Reviewing:
- Peer Review Process: Have students present their sketches and labels to a teacher or peer for feedback. This collaborative approach fosters critical thinking and reflection on their work.
- Focus on Accuracy: During the review, the teacher or peer should check for the accuracy of both the drawings and the labels, ensuring that all parts are correctly represented.
- Constructive Feedback: Encourage the reviewer to provide specific, constructive feedback that highlights strengths and suggests areas for improvement, which will help students refine their understanding and skills.
Through this labeling process, students engage in active learning. Reinforcing their knowledge of microscope components and their applications in scientific study.
Conclusion: The Value of a Labeled Diagram of a Microscope
In conclusion, the labeled diagram of a microscope is an essential educational tool for student learning. It provides a clear visual representation of critical components, facilitating better understanding and engagement with the subject matter. Students who familiarize themselves with the anatomy and functionality of microscopes will build a strong foundation that serves them in their academic journeys.
Using labeled diagrams in the classroom not only enhances learning but also promotes collaboration and curiosity among students. As they delve into the biological and chemical realms, understanding microscopy will undeniably deepen their appreciation for the intricate complexities of life. By integrating visual aids and interactive learning experiences, educators can foster scientific exploration that prepares students for future endeavors in research and discovery. The labeled diagram of a microscope is not merely a reference; it is a gateway to the exciting world of science.